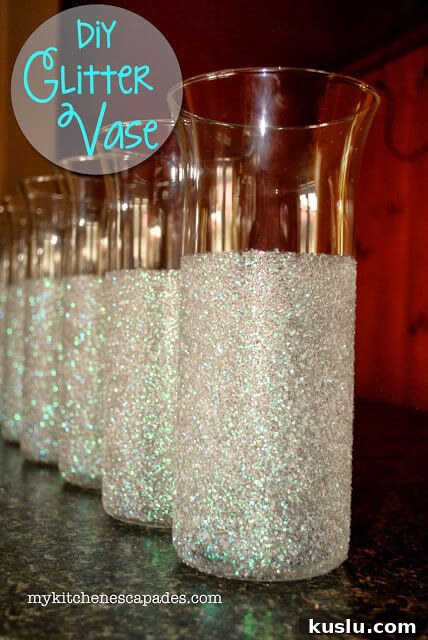
A glitter vase is an affordable, simple decoration that works beautifully for weddings, holiday centerpieces, or any event that needs a touch of sparkle. You can transform an existing vase or a budget-friendly find into a glowing centerpiece with just glitter and Mod Podge. The result is elegant and can be lit from the inside with tea lights or battery-powered candles for an enchanting effect.
Why I Love This Glitter Vase
For my daughter’s wedding we wanted to keep costs low while still achieving a polished, magical look. To encourage creativity and thrift, we set a modest wedding budget and promised to double any unspent funds as a cash gift. That approach motivated us to DIY many elements, and the glitter vases were a standout. They fit perfectly with the wedding’s “Winter Wonderland” theme, and the same technique can be adapted to any color scheme or season. I saved all the decor for future events — simple projects like these are versatile and easy to reuse.
Vases for Centerpieces
Table centerpieces set the tone for a reception or party, so investing a little time in them pays off in compliments and visual impact. Glittered vases draw the eye and add a warm, festive glow when illuminated. They’re an inexpensive way to create cohesion across tables and elevate the overall decor.
I originally saw the idea on a craft blog and decided to make a dozen vases using inexpensive glass vases, Mod Podge, and glitter. You’ll likely have leftover supplies, which can be used for other DIY decor projects.
What Is a Glitter Vase
A glitter vase is a decorated vessel—typically a simple glass or ceramic vase—coated with adhesive and glitter. When sealed with a clear topcoat, the glitter stays in place and the vase can be used as a centerpiece filled with candles, lights, flowers, or seasonal accents. Glass vases with translucent glitter work especially well when you want candlelight to shine through.
How To Make a Glitter Vase
Making a glitter vase is straightforward. Start with a clean, inexpensive glass vase. The following steps outline a reliable method to achieve a smooth, durable finish.
Time needed: About 2 hours (plus drying time)
How to Make a Glitter Vase
- Select and clean the glass vase
Thoroughly clean and dry the vase so the adhesive and glitter adhere evenly.
- Mask areas you don’t want glittered
Use painter’s tape or masking tape to create sharp lines and protect rims or sections from adhesive. Press the tape edges firmly to prevent seepage.
- Apply adhesive
Brush a thin, even layer of Mod Podge (or similar clear-drying adhesive) over the exposed area. It may appear white at first but will dry clear.
- Add glitter
Work over a sheet of paper to catch excess glitter. Sprinkle generously and tap to settle the glitter into the adhesive. Return unused glitter to its container.
- Let it dry
Allow the adhesive to fully dry; drying time varies but is often 1–2 hours depending on conditions.
- Seal the glitter
Thin a small amount of Mod Podge with water to create a fluid topcoat. Gently brush this over the glitter to lock it in place.
- Remove the tape
Peel the tape off after applying the topcoat but before it fully dries to avoid pulling glitter away with the tape.
- Final dry
For best results, let the finished vase cure overnight before using.
Step-by-Step Directions
Step One
Begin by taping off the area where you want the glitter to stop. Use masking or painter’s tape and press the edge down firmly with your fingernail so adhesive won’t seep under. If you prefer stripes or other patterns, plan and place additional tape accordingly.
Step Two
Brush a thin, even coat of Mod Podge over the exposed area. Work carefully near the tape so glue doesn’t crawl under the edge. The adhesive dries clear, so the white initial appearance is normal.
Step Three
Lay a clean sheet of paper underneath and cover the adhesive with glitter. Tap the vase gently to even out coverage and add glitter to any sparse spots. Fold the paper to funnel excess glitter back into its container. Let the adhesive dry until clear.
Step Four
Mix a small amount of Mod Podge with water to create a thinner topcoat. Brush this over the glitter to seal it. Remove the tape while the topcoat is still wet to avoid lifting glitter. Let the vase dry completely, ideally overnight.
Glitter Vase FAQs & Troubleshooting
Use an adhesive like Mod Podge to coat the vase, sprinkle glitter over the adhesive, let it dry, then seal with a thinned topcoat of Mod Podge to prevent shedding. Work over paper to capture excess glitter for reuse.
Can I use any color of glitter?
Yes. Any glitter color will adhere with this method. Clear or translucent glitter lets candlelight or twinkle lights shine through; opaque glitter will create a more solid, reflective finish that won’t transmit light as much.
Will this work on a ceramic vase?
Absolutely. The same steps apply to ceramic vases. The main difference is that ceramic is not translucent, so the light-through effect is reduced. Still, glittered ceramic looks elegant and can refresh older pieces.
How to wash a glitter vase
Do not place glittered vases in the dishwasher. Hand wash the interior with gentle soap and water. Wipe the outside with a damp cloth to preserve the sealed glitter finish.
Does the Mod Podge dull the glitter?
Mod Podge dries clear and, when used properly, does not dull the glitter. If you prefer extra shine, choose a glossy topcoat. Even so, avoid dishwashing to maintain the finish.
Help! The glitter came off when I removed the tape.
If glitter peels with the tape, it usually means the tape was removed after the topcoat fully dried. In that case, carefully score along the tape edge with a razor blade to create a clean line, then touch up any gaps with a fine brush and a little adhesive and glitter. If adhesive seeped under the tape, wait until it dries and gently scrape or file the excess, then redo that section if needed.
Glitter vases are versatile beyond weddings — they make lovely Christmas or seasonal decor as well. For lighting, battery-powered tea lights are a safe and reliable option for centerpieces, though real tea candles can also be used with caution. Fill the vases with greenery, ornaments, flowers, or other accents to suit your event.
If you enjoyed this project and want more budget-friendly wedding decor ideas, consider exploring additional DIY tutorials and inspiration to help you craft a beautiful celebration while keeping costs manageable.
Looking for More DIY Wedding Decor?
If this glitter vase tutorial inspired you, there are many other simple, affordable projects that can make a big impact. Try draping ceilings, creating a DIY cake display, or transferring photos to wood for personalized mementos. Small touches add up to an unforgettable event.
Subscribe to get new recipes and DIY resources delivered directly to your inbox and follow craft accounts on social platforms for more project ideas and step-by-step inspiration.
Note: This article originally referenced products and resources used during the project. If you try the technique, choose products you trust and follow safety guidelines for adhesive use and candle placement.